If you’re new to archery you may be wondering how archery sights work. With the different types and varieties, which kind should you buy? And how exactly are you supposed to use it?
Well, fear not, this page should help to answer all of your questions about setting up and using sights on your bow. If you’re ready to get started, let’s jump right in:
Single Pin and Multi-Pinned Sights
First you need to understand the difference between the two main types of bow sights that are most commonly used. There are single pin sights (this one is my personal favorite), which have one aiming pin which can be changed by adjusting a couple of dials – to compensate for different distances.
The other main type of sights used are multi-pin sights (also known as fixed pin sights). These are sights normally have between 3 and 5 aiming pins, which are carefully set up before going out into the field.
They’re referred to as fixed pin sights because after the pins are in initially set up, they cannot be easily moved or adjusted. During the sighting (or set up) process each pin is carefully adjusted for a given distance, once set up the sight is ready to be used.
Each pin is used to accurately aim at a different distance. So for example, a three pin sight may have one pin for aiming at a yardage of 10 yards, another pin for aiming at 20 yards away, and the last pin for aiming at 30 yards distance.
The pins can be configured for any yardage distances you like. Some common multi-pin set ups are 20 / 30 / 40 yards, 15 / 20 / 25 yards and 25 / 35 / 45 yards. You should ideally set up your aiming pins based not only on your ability as an archer – but also what distances your bow is capable of shooting.
Note: Take a quick look at your bow: Most bows of any type today have manufactured holes already installed for attaching a sight. When you’re attaching a sight (of either kind) for the first time, be careful not to tighten the screws too much, as it could damage your bow.
If you don’t already have one, be sure to pick up a multi-sized Allen wrench tool. You want it not only for attaching some sights – but for adjusting the aiming pins on a multi-pinned sight as well.
How to Use Single Pin Sights
Many archers prefer using single pin sights over their multi-pinned counterparts for the simplicity of their use. Unlike many multi-pinned sights, single pin sights offer a very uncluttered sight picture – allowing you to see the target as clearly as possible.
Single pin sights also prevent you from accidentally shooting the wrong pin, which has frustrated many a hunter over the years.
If you’re new to using a single pin sight, start practicing with it as much as you can now – it can take a little while to get used to a single pin sight especially if you’ve been using a multi-pinned sight for any length of time.
When you’re shooting at still targets, you can just dial in the exact yardage that you’re about to shoot. You’ll have to change this up when trying to shoot at moving targets. Using one of these along with your sight will make things a lot easier.
Using Single Pinned Sights on Moving Targets
A good practice that most users of single pinned sights will use is to get it set up for a range of 20 to 25 yards, whatever feels most comfortable for you. Then, using the known range of 20 yards – they’ll just aim above or below the target to adjust for yardage.
Rather than shooting an almost exact range with a multi-pinned sight, you just compensate for the yardage by aiming high or low. Most archers can comfortably shoot anywhere from right in front of them to 40 or 50 yards away, without needing to adjust their sight.
It’ll be something that you’ll get used to after enough practice.
How to Sight In a Single Pin Sight
First, decide on what distance of a yardage you want to set up your sight for. As I mentioned above, you could start by setting it for 20 or 25 yards. Then walk to that distance away from your target, either by using a rangefinder or by having already measured the correct distance away from the target.
Aim directly at the center of the target and shoot 3 of the exact same type of arrows, one at a time, taking your time to aim and shoot carefully. They should group pretty close together, if that’s the case, just remove the arrows and this time just shoot one single arrow at the target.
If they’re not grouping well together something is either off in your shooting or one of your arrows needs to be checked.
If your shots grouped well, simply adjust you sight towards the single arrow that you just fired. You want to “follow the missed shot”. In other words, if your shot went left, adjust the sight to the left. If your shot went down, adjust the sight down. Most likely you’ll have to adjust both vertically and horizontally. For example: Your shot hit above and to the right.
Look through the sight aiming directly at the middle of the target, as you did before. Now keeping your bow still, adjust the sight towards where the missed arrow is on the target. You want to adjust the sight until the missed arrow is directly where you sight is aiming.
Remove the arrow from the target, go back to the distance you’ve chosen and shoot another arrow directly at the center of the target. It should be pretty close this time. If it needs any tweaking, simply repeat the process above until your sight is accurately lined up for your chosen yardage.
How to Use Multi-Pin Sights
While many archers love their single pin sights, the most commonly used type of bow sight is the multi-pinned, fixed pin sight. As we covered above, you can use a single pin sight for hunting, you just need to be better at compensating for the difference in yardage between the point that your sight is set up for and the actual distance of the target.
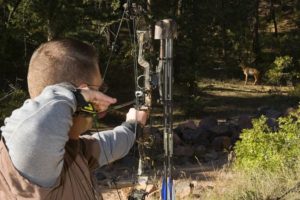
Most hunters instead use multi-pinned sights, as if a target starts moving, they can just use a different distance pin. For example: A deer is 20 yards away, you line up the 20 yard pin, suddenly the deer sprints to 35 yards away, you then just put the deer between your 30 and 40 yard pins.
When it comes to distance, by having several points of reference – it becomes easier for some people to estimate the range of a moving target. Note that I said for “some” people.
Many archers will say that they can’t use a single pin sight, until they practice with it for a little while. It’s actually easier for some people to aim at moving targets with single pin sights, because of the clear, uncluttered sight picture.
You’ll have to decide which is easier for you, and fits in with your shooting style.
As for multi-pinned sights, a good way use them is to guess the distance from the target, and place the center of the target centered between the two closest distance pins.
How to Sight In Multi-Pin Sights
Using an Allen wrench, adjust all of the aiming pins to the middle most point.
Get a hold of a very durable archery target for use when sighting in your sight, as sighting in a multi-pinned sight can take lots of shots to get all of the pins sighted accurately.
Using a rangefinder (this is a great one), mark the ground at every ten yard point from the target, up to 40 or 50 yards away.
The following process will sight in your bow sight at the twenty, thirty and forty yard distances, respectively. If you’d rather sight in your sight at different distances, you can easily do so by following along below, while using your own yardages.
Start by standing at the 10 yard mark. Aiming the very top pin directly at the center of the target, shoot 3 of the exact same type of arrows, one at a time, taking your time to aim and shoot carefully.
Again, as described above you want to follow the misses by adjusting the the sight box itself in the direction of the missed arrow. Repeat this until arrows are shooting in line with where you’re aiming.
Then move to the 20 yard mark and repeat the above steps, raising up the sight box if needed. Repeat until arrows are in line with where you are aiming again. You can then make small adjustments horizontally, if your arrows are landing to the right or left of where you’re aiming.
Now, stand at the 30 yard mark and shoot some arrows at the target, this time using the second pin, rather then the top pin as you did before. You can then follow the misses again and make any needed vertical changes, moving the sight box itself as you did previously.
Now stand at the 40 yard mark and repeat by shooting three arrows at the center of the target, this time aiming with the third aiming pin on the sight. This time however, when you make corrections to the arrows hitting too high or too low, use your Allen wrench to adjust the actual aiming pin itself, not the sight box as you did before.
If you find that for some reason your arrows are hitting off vertically, either too far right or too far left – do not make adjustments for it right now. You will have to stand back at the 30 yard mark and make your left / right corrections from that yardage.
Now go back to the 20 yard mark, and shoot three arrows from this distance again. If your sight is off, you can now use your Allen wrench to adjust the aiming pin this time, not moving the sight box at all at this point.
Your sight should now be accurately set up to shoot at 20 / 30 / 40 yard ranges. If you ever need to adjust or fine tune your sight, simply repeat the entire process above.
Tips:
1 – When you’re sighting in any bow sight, you will need to keep a consistent anchor point. Your anchor point is the point where your bowstring hand anchors when you aim at a target at full draw.
Keeping a consistent anchor point is important as changing it even slightly changes the point from where you are releasing the arrow – which reduces your accuracy.
2 – It’s a good idea to split up the process of sighting in your new sight over several different occasions. You can do a little bit of sighting in each day for a few days.
The reason for this is that after a while of constant shooting, muscle fatigue can set in on your arms and chest. If you allow fatigue to set in, it will mess with your shooting form, and start to make your shots far from accurate.
By splitting up the sighting in process over a few days time, you can ensure that your bow and your sight are set up far more accurately.
3 – You know that feeling that you’re just ‘in the zone’, doing something well – and everything just seems to flow? If you’re just not feeling “in the groove” or you’re “in a funky mood” then: Skip sighting in your sight for the day!
Wait for another day. It takes quite a bit of fiddling and tweaking to get your sight set up just right, so don’t risk ruining all the work you’ve done up to this point by trying to sight it in when you’re not feeling up to it.
Using Peep Sights
You may or may not want to use a peep sight in addition to your front end bow sight. A peep sight is a small hole sight that’s connected to the bowstring. When the bowstring is at full draw, it allows you to look through the string at the front bow sight.
You simply look through the hole, which should look like a black tunnel, and line up so that you can see your bow sight through it. Once you can clearly see your bow sight through your peep sight, line up the correct aiming pin and your target so that they’re directly in the center of the peep sight.
It may take you a bit of practicing with a peep sight to get it down, or you may skip using a peep sight altogether.
I hope that this has helped you understand the different types of bow sights, how they’re used and how to set them up to properly work with your bow. As with pretty much anything in archery, practice makes perfect.
It may take you a while using a sight to get it down, but it can be a useful tool if you do. If you’re still not sure whether you want to go with a single pin or fixed pin sight, see if you can find a specialty archery store nearby.
If you’ve got one close to you, head out and bring your bow with you. You’ll be able to try both styles out and decide which one is right for you.
If you’ve got the budget for it, you could even get a low priced, entry level version of each. There are many entry level bow sights that only cost between $20 and $30 from most online retailers.
That way you’re able to take enough time to practice with each of them, and decide what you like using better. Or you could use each for different situations and different types of shooting, many archers do just that.